NVIDIA Jetson
Quick Start
- The working directory in SSD (Samsung 970 EVO 1TB) in lkk@xavieragx:/ssd$
conda activate mycondapy310
Jetson Xavier AGX Setup
Detailed steps see my Google doc: https://docs.google.com/document/d/1OAvlxpsP6h7YDicX29Bo7IWV_irWsoOyeB0_lujoHME/edit#heading=h.l55ml9jogv02
Jetpack page: https://developer.nvidia.com/embedded/jetpack
Show Jetpack version:
sudo apt show nvidia-jetpack #show 5.0.2
git clone https://github.com/jetsonhacks/jetsonUtilities.git #option2
cd jetsonUtilities
python jetsonInfo.py
(Not tried, list file not found) To upgrade from previous JetPack 5.x releases, first edit etc/apt/sources.list.d/nvidia-l4t-apt-source.list to point to the 35.3 repo (just change the version to r35.3 in both lines). Next, use the following commands, then physically reboot the system:
sudo apt update
sudo apt dist-upgrade
sudo apt install --fix-broken -o Dpkg::Options::="--force-overwrite"
Jetson Orin Nano
- Jetson Orin Nano: Jetson Orin Nano 8GB with SD card slot (P3767-0005)
Jetson Orin Nano Developer Kit User Guide: https://developer.nvidia.com/embedded/learn/jetson-orin-nano-devkit-user-guide/index.html
Develop guide: https://docs.nvidia.com/jetson/archives/r35.3.1/DeveloperGuide/index.html
Software setup: https://developer.nvidia.com/embedded/learn/jetson-orin-nano-devkit-user-guide/software_setup.html
Howto: https://developer.nvidia.com/embedded/learn/jetson-orin-nano-devkit-user-guide/howto.html
The new version the NVIDIA SDK Manager supports various flash options, for example, the base L4T BSP can be flashed to any storage medium (microSD card, NVMe SSD, USB drive, or eMMC). We can direct flash the L4T to the NVMe SSD without the previous complicated steps of booting system in eMMC, then moving data to SSD.
Prepare the Host Machine with NVIDIA SDK Manager
- Install NVIDIA SDK manager, ref: https://developer.nvidia.com/nvidia-sdk-manager
On your x86-64 PC, download the Debian package file for the latest SDK Manager: https://developer.nvidia.com/embedded/downloads
Run the following command to install the Debian package: “sudo apt install ./sdkmanager_xx_amd64.deb”
Installed SDK Manager on Intel NUC6 with Ubuntu20.04 (upgraded from Ubuntu18.04), the current version of SDK manager cannot be installed on Ubuntu22.04 (cannot flash the jetson)
Intel NUC6 (mini pc) is in ENG276, account name is “lkk”, password is: studenteng276
Flash L4T to Jetson via SDK Manager
- Connect NVIDIA Jetson Orin Nano Developer Kit to the PC with a USB Type-C cable. Turn the Jetson dev kit in Force Recovery Mode:
For Jetson Orin Nano: prepare a jumper cable (any ribbon cable) to shortening the FC REC pin and GND pin of the 12-pin header under the module, then insert the power supply plug into the DC jack. While shortening the FC REC pin and GND pin of the 12-pin header under the module, insert the power supply plug into the DC jack. This will turn on the Jetson dev kit in Force Recovery Mode.
For Jetson AGX device with three buttons: Press and hold the FORCE RECOVERY button (middle button). While pressing the FORCE RECOVERY button, press and release the RESET button (third button).
In the host PC, you can type “lsusb” to see the USB device with “nvidia” name

Launch SDK Manger, it will popup a window show detected devices, select the device in the list. From the Product Category panel, select Jetson. From the Hardware Configuration panel, de-select “Host Machine” and select Jetson Orin Nano Developer Kit for Target Hardware. Click ” CONTINUE ” button. Setup Process window shows the download progress.
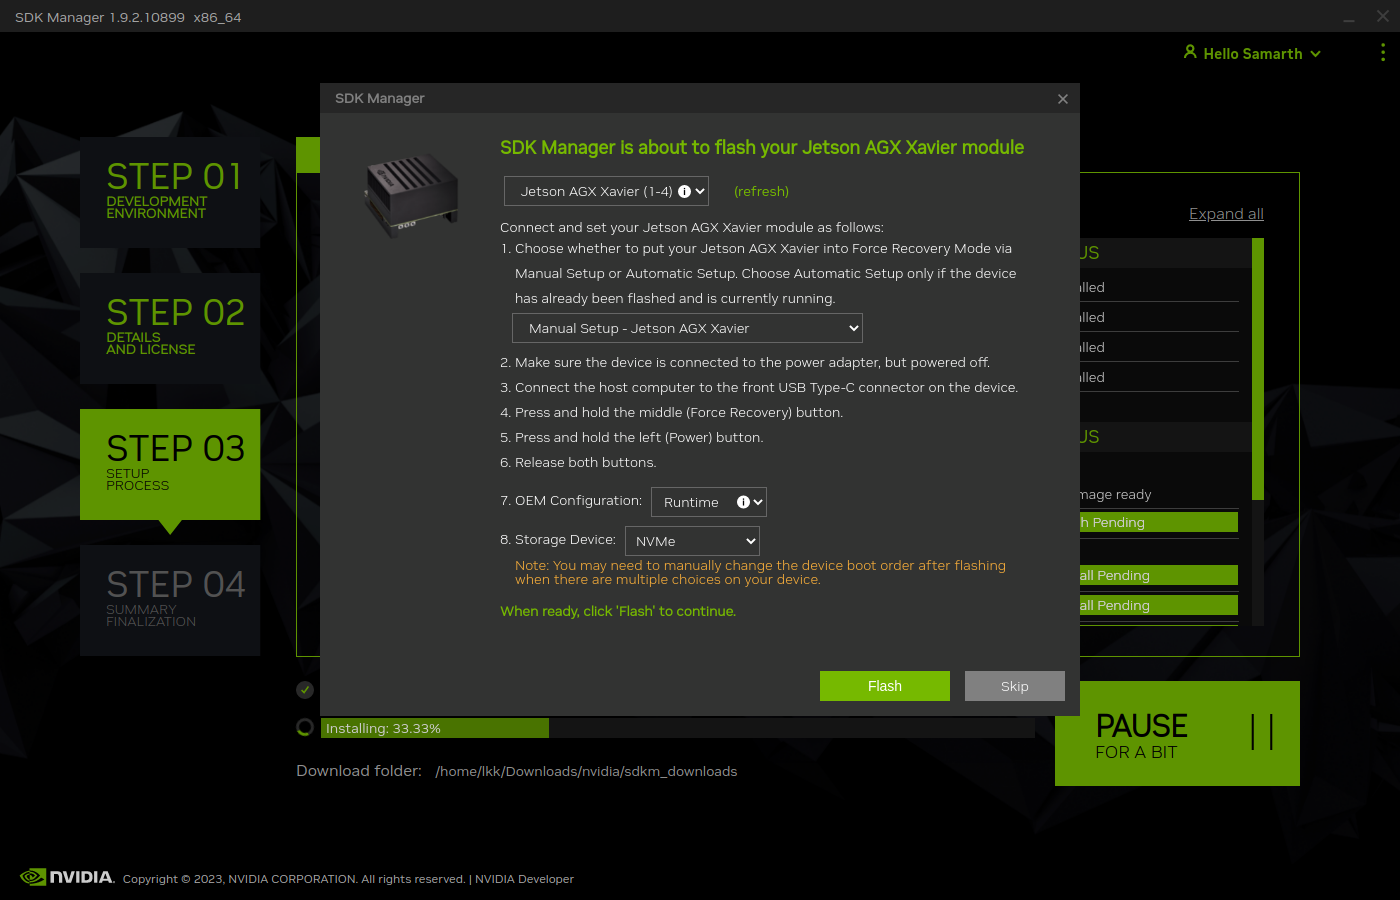
- After the download is finished, SDK Manager went to step3 and opens a dialog show “SDK Manager is about to flash your Jetson XXX”. This prompt provides instructions for preparing your device to get it ready for flashing. On the flashing prompt
Select “Manual Setup - Jetson XX” for 1.
In OEM configuration (7), “Pre-Config” means you will create the username/password for the Orin before flashing; “Runtime” means the username/password creation will be prompted when you boot the Orin after the flash.
If choosing “Pre-Config”, enter the user name and password you want to setup in the Jetson.
In (8), you can select storage device, i.e., eMMC, NVMe. We can select NVMe to flash the L4T in the SSD. Then, Click “Flash” button.
Jetson AGX Xavier can now support boot form NVMe SSD. The default boot is still eMMC, but you can select NVMe:
- When flashing is done, the SDK Manager will popup another windows of “SDK Manager is about to Install SDK components on your Jetson”.
In this step, plugin the displayport or HDMI to the Jetson and complete the Ubuntu system configuration wizard. If the Jetson did not boot, click the RESET button to restart.
After the Jetson initial setup is finished, go back to the host PC with NVIDIA SDK manager.
Select the “USB”, enter Username and Password, then click “Install” BSP.

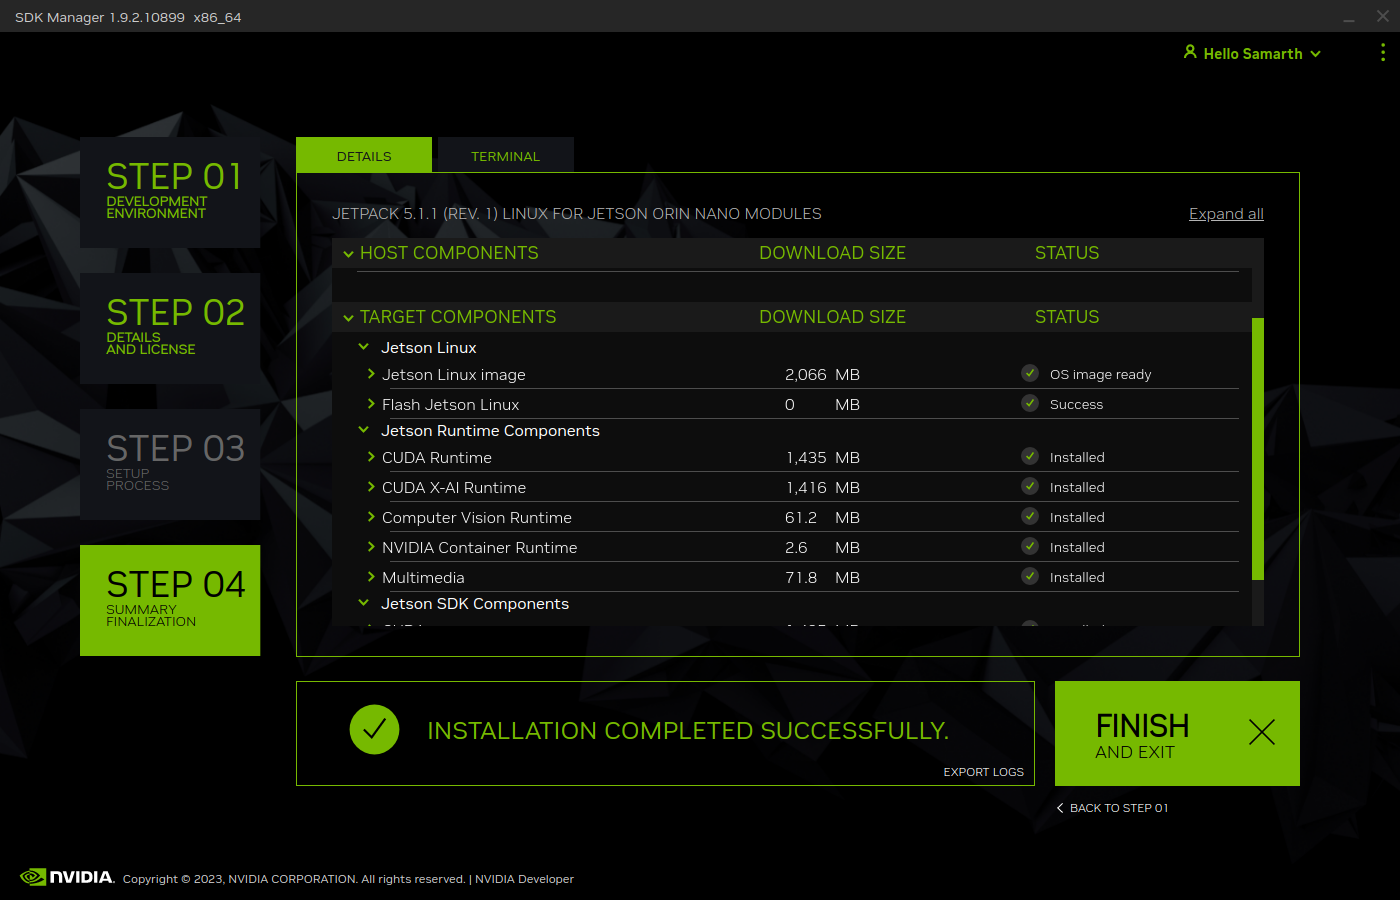
When you the SDK is installed, you can see the final success screen in SDK manager.
- If you wish to customize your OS components before flashing, check these links
Compiling Source Code: https://developer.ridgerun.com/wiki/index.php/NVIDIA_Jetson_Orin/JetPack_5.0.2/Compiling_Code
Flashing Board From Cmdline: https://developer.ridgerun.com/wiki/index.php/NVIDIA_Jetson_Orin/JetPack_5.0.2/Flashing_Board
Jetson System Setup
Check L4T version and system information
JetPack 5.1.1 includes NVIDIA Jetson Linux 35.3.1 which includes the Linux Kernel 5.10, UEFI based bootloader, Ubuntu 20.04 based root file system, NVIDIA drivers, necessary firmwares, toolchain and more.
lkk@lkk-xavieragx:~/Developer$ python3 -V
Python 3.8.10
lkk@lkk-xavieragx:~/Developer$ python -V
Python 2.7.18
lkk@lkk-xavieragx:~/Developer$ nvcc -V
nvcc: NVIDIA (R) Cuda compiler driver
Copyright (c) 2005-2022 NVIDIA Corporation
Built on Sun_Oct_23_22:16:07_PDT_2022
Cuda compilation tools, release 11.4, V11.4.315
Build cuda_11.4.r11.4/compiler.31964100_0
:~/Developer/jetsonUtilities$ sudo apt show nvidia-jetpack
Package: nvidia-jetpack
Version: 5.1.1-b56
$ dpkg-query --show nvidia-l4t-core
nvidia-l4t-core      35.3.1-20230319081403
:~/Developer$ git clone https://github.com/jetsonhacks/jetsonUtilities.git
:~/Developer$ cd jetsonUtilities/
:~/Developer/jetsonUtilities$ python jetsonInfo.py
NVIDIA Jetson-AGX
 L4T 35.3.1 [ JetPack UNKNOWN ]
   Ubuntu 20.04.5 LTS
   Kernel Version: 5.10.104-tegra
 CUDA 11.4.315
   CUDA Architecture: NONE
 OpenCV version: 4.5.4
   OpenCV Cuda: NO
 CUDNN: 8.6.0.166
 TensorRT: 8.5.2.2
 Vision Works: NOT_INSTALLED
 VPI: 2.2.7
 Vulcan: 1.3.204
Check Jetson CUDA
$ sudo apt-get install -y --no-install-recommends make g++ #already installed in Jetson
lkk@lkk-xavieragx:~/Developer$ cp -r /usr/local/cuda/samples .
lkk@lkk-xavieragx:~/Developer$ ls
jetson-containers  jetsonUtilities  samples
lkk@lkk-xavieragx:~/Developer$ cd samples/1_Utilities/deviceQuery
lkk@lkk-xavieragx:~/Developer/samples/1_Utilities/deviceQuery$ make
lkk@lkk-xavieragx:~/Developer/samples/1_Utilities/deviceQuery$ ./deviceQuery
deviceQuery, CUDA Driver = CUDART, CUDA Driver Version = 11.4, CUDA Runtime Version = 11.4, NumDevs = 1
Result = PASS
Test CUDNN
lkk@lkk-xavieragx:~/Developer$ cp -r /usr/src/cudnn_samples_v8/ .
lkk@lkk-xavieragx:~/Developer$ cd cudnn_samples_v8/conv_sample/
lkk@lkk-xavieragx:~/Developer/cudnn_samples_v8/conv_sample$ make
lkk@lkk-xavieragx:~/Developer/cudnn_samples_v8/conv_sample$ ./conv_sample
^^^^ CUDA : elapsed = 1.78592 sec,
Test PASSED
Test TensorRT
/usr/src/tensorrt/bin/trtexec --model=/usr/src/tensorrt/data/googlenet/googlenet.caffemodel --deploy=/usr/src/tensorrt/data/googlenet/googlenet.prototxt --output=prob
&&&& PASSED TensorRT.trtexec [TensorRT v8502] #
Jetson Remote Access
In the local computer, install https://www.xquartz.org in Mac, or https://sourceforge.net/projects/xming/ in Windows. ref: https://kb.iu.edu/d/bdnt
ssh to the jetson with -Y option
$ sudo apt-get install x11-apps
$ xclock # xeyes to test the x11 window forwarding
X11 window forwarding does not work for ssh to jetson, then launch container https://blog.yadutaf.fr/2017/09/10/running-a-graphical-app-in-a-docker-container-on-a-remote-server/
Jetson Docker Setup
In Settings, click Sharing, enable Screen Sharing. VNC address is vnc://lkk-xavieragx.local, IP: 192.168.86.27 Jetson Orin nano: IP: 192.168.86.29 vnc://lkk-orinnano.local
Use docker without sudo, ref: https://docs.docker.com/engine/install/linux-postinstall/
$ sudo groupadd docker
groupadd: group 'docker' already exists
$ sudo usermod -aG docker $USER
Logout and re-login, then use docker without sudo
You can check that the NVIDIA Container Runtime is installed by running the following commands:
sudo dpkg --get-selections | grep nvidia
libnvidia-container-tools                    install
libnvidia-container0:arm64                   install
libnvidia-container1:arm64                   install
nvidia-container-runtime                     install
nvidia-container-toolkit                     install
nvidia-docker2                                       install
Change default docker runtime to nvidia:
$ sudo apt-get install nano
$ sudo nano /etc/docker/daemon.json
{
    "default-runtime": "nvidia",
    "runtimes": {
        "nvidia": {
            "path": "nvidia-container-runtime",
            "runtimeArgs": []
        }
    }
}
Add “default-runtime” in daemon.json, You can also check docker info to see the default runtime is nvidia.
$ systemctl restart docker
$ sudo docker info | grep nvidia
 Runtimes: io.containerd.runc.v2 io.containerd.runtime.v1.linux nvidia runc
 Default Runtime: nvidia
Select Jetson containers in https://github.com/dusty-nv/jetson-containers, try the l4t-base image: https://catalog.ngc.nvidia.com/orgs/nvidia/containers/l4t-base. Download the L4T-base container from NGC:
$ docker pull nvcr.io/nvidia/l4t-base:35.3.1
$ docker images
REPOSITORY                TAG       IMAGE ID       CREATED        SIZE
nvcr.io/nvidia/l4t-base   35.3.1    023a91e93759   2 months ago   708MB
lkk@lkk-xavieragx:~/Developer$ docker run -it --rm --net=host nvcr.io/nvidia/l4t-base:35.3.1
root@lkk-xavieragx:/# python3 -V
Python 3.8.10
Build pytorch container (based on https://catalog.ngc.nvidia.com/orgs/nvidia/containers/l4t-jetpack):
lkk@lkk-xavieragx:~/Developer$ git clone https://github.com/dusty-nv/jetson-containers
lkk@lkk-xavieragx:~/Developer/jetson-containers$ ./scripts/docker_build_ml.sh pytorch
ARCH:  aarch64
reading L4T version from /etc/nv_tegra_release
L4T BSP Version:  L4T R35.3.1
L4T Base Image:   nvcr.io/nvidia/l4t-jetpack:r35.3.1
selecting OpenCV for L4T R35.3.1...
OPENCV_URL=https://nvidia.box.com/shared/static/2hssa5g3v28ozvo3tc3qwxmn78yerca9.gz
OPENCV_DEB=OpenCV-4.5.0-aarch64.tar.gz
Python3 version:  3.8
building PyTorch torch-2.0.0+nv23.05-cp38-cp38-linux_aarch64.whl, torchvision v0.15.1, torchaudio v2.0.1, cuda arch 7.2;8.7
Building l4t-pytorch:r35.3.1-pth2.0-py3 container...
.....
Successfully built 3fd38d3aa7d6
Successfully tagged l4t-pytorch:r35.3.1-pth2.0-py3
done building PyTorch torch-2.0.0+nv23.05-cp38-cp38-linux_aarch64.whl, torchvision v0.15.1, torchaudio v2.0.1, cuda arch 7.2;8.7
lkk@lkk-xavieragx:~/Developer/jetson-containers$ docker images
REPOSITORY                   TAG                  IMAGE ID       CREATED          SIZE
l4t-pytorch                  r35.3.1-pth2.0-py3   3fd38d3aa7d6   19 minutes ago   11.1GB
nvcr.io/nvidia/l4t-jetpack   r35.3.1              ff2dd43d5687   6 weeks ago      9.77GB
lkk@lkk-xavieragx:~/Developer/jetson-containers$ docker run -it --rm --net=host l4t-pytorch:r35.3.1-pth2.0-py3
root@lkk-xavieragx:/# nvcc -V #11.4
Test container
~/Developer/jetson-containers$ ./scripts/docker_test_ml.sh pytorch
Install Miniconda for ARM
Ref: https://conda.io/projects/conda/en/stable/user-guide/install/linux.html
Install python-pip
sudo apt install python3-pip #otherwise pip3 list does not work
Install miniconda
wget https://repo.anaconda.com/miniconda/Miniconda3-latest-Linux-aarch64.sh
bash Miniconda3-latest-Linux-aarch64.sh #select the install location, select conda init
conda config --set auto_activate_base false # if do not want to activate base automatically
conda list
conda update conda
conda --version
conda info
conda update -n base conda
conda create --name myconda
conda env create -f environment.yml #Creating an environment from an environment.yml file
conda activate myconda #activate environment
conda env list
conda info --envs #same to the previous one
conda deactivate #deactivate environment
https://docs.nvidia.com/deeplearning/frameworks/install-pytorch-jetson-platform/index.html#undefined
Install VSCode for ARM
VERSION=latest
wget -N -O vscode-linux-deb.arm64.deb https://update.code.visualstudio.com/$VERSION/linux-deb-arm64/stable
sudo apt install ./vscode-linux-deb.arm64.deb
# Install a Python linter
pip3 install pylint
# Install a Python formatter
pip3 install black

# Install the Python extension for Visual Studio Code
# Extension name is ms-python.python
code --install-extension ms-python.python --force
Camera
To install a camera module, connect its flex ribbon cable into the camera connector (J5). Follow these steps:
Gently lift up the the connector latch (see 1st figure). Insert the camera ribbon cable. (See 2nd & 3rd figures) The metal contacts should face toward the center of the developer kit. Gently press down on the connector latch until stops. This may require two fingers, each at one end of the latch. Do not use excessive force.
In order to check that the CSI camera is working, you can run the following command, which will start capture and preview display it on the screen.
nvgstcapture-1.0
nvgstcapture-1.0 --orientation 2 #rotate the image 180 degrees (vertical flip)
Press 'j' to Capture one image.
Press 'q' to exit
Press '1' to Start recording video
Press '0' to Stop recording video
For USB camera, you’ll need to tell nvgstcapture where to find your USB camera device (in place of the default CSI camera).
- # V4L2 USB camera (where <N> is the /dev/videoN node)
nvgstcapture-1.0 –camsrc=0 –cap-dev-node=<N> nvgstcapture-1.0 –mode=2 –camsrc=0 –cap-dev-node=<N> (where N is the /dev/videoN Node)
Use the camera within a container For CSI camera: The commands are the same, just add this option to the command line when you launch the container with “docker run”
--volume /tmp/argus_socket:/tmp/argus_socket
For USB camera: When you launch your container with “docker run “, mount the corresponding /dev/video* device by adding the following option to the command line:
--device /dev/video0
https://docs.arducam.com/Nvidia-Jetson-Camera/Native-Camera/Quick-Start-Guide/
References
https://docs.nvidia.com/jetson/ https://docs.nvidia.com/jetson/jetpack/introduction/index.html Jetson Developer Guide: https://docs.nvidia.com/jetson/archives/r35.3.1/DeveloperGuide/index.html Jetson Sensor Processing Engine (SPE) Developer Guide: https://docs.nvidia.com/jetson/archives/r35.3.1/spe/index.html https://developer.nvidia.com/embedded/learn/tutorials/first-picture-csi-usb-camera https://github.com/JetsonHacksNano/CSI-Camera https://jetsonhacks.com/2023/04/05/using-the-jetson-orin-nano-with-csi-cameras/ https://developer.nvidia.com/embedded/learn/jetson-nano-2gb-devkit-user-guide#id-.JetsonNano2GBDeveloperKitUserGuidevbatuu_v1.0-Camera https://github.com/dusty-nv/jetson-inference https://github.com/dusty-nv/jetson-inference/blob/master/docs/aux-streaming.md